I have more witches and other drawing/sketches I would like to share. This is also for myself so that I can look back a year from now and see all that has been accomplished - I hope.
Le Petite Dolls
The Men
I'm still drawing and I am so far behind.
Thank goodness Suzi Blu has extended the time of her classes and made us all an offer to get updates at the beginning of the month for a very small fee!
Progress?
Another Witch
One more bad witch minus hair
If nothing else, I hope this promotes and not discourages people to check out everything "Suzi Blu."
Well, since my Suzi Blu class at Stamping Details, I have been busy. I have found that sketching and drawing and colored pencils are the most relaxing thing I have ever done. It doesn't matter if my girls aren't perfect - I am having so much fun. Be sure to check out Suzi Blu's online class!
On my own - two page spread
Blondie - finished
You saw the two page blonde spread that I did in class on my previous blog. Well above is the new "red head" along with a finished "Blondie" all in my little moleskine. Amazing, until I scanned it and posted it, I did not see how off center the "girl with red hair"'s lip is. Very interesting. Still lots to learn and practice, practice, pratice!
And then, Elena of Scrapbook Royalty saw my girls and loved them. She asked me to draw a "Good Witch" and a "Bad Witch" for a charily event she is having next March. I told her I am a total novice but she said, no problem, she had confidence in my ability.
there wasn't much time because Elena needed something in 3 days for a logo to put it up on her website. Well, I thought I was finished with something she could use and sent it to her. She called me that night and wondered if I had forgotten something - like hair. . . and then she said she would also like the background to be a rainbow.
The "Hairy" Good Witch
Talk about adding hair after the fact and at 11 pm at night. I went a little crazy and where before they had no hair but were beautiful, now they have really had HAIR! Well, that gave Elena something she could put up on her website right away. But I think I have something so much better for her that I will finish this week so she can replace my original "hairy girls" in her logo for the event. Then I will have plenty of time to create the same new faces on two 9x12's that will be dimensional.
The drawings of the new "girls" are the first three drawings at the top. Again, seeing them scanned and on my screen, I can see things I am going to change before I finish putting colored pencil on their faces and then painting them and cutting them out. They will have wings and things and be on a 9x12 canvas each.
From just doing this blog, I have learned that I should always scan everything and look at my work with fresh eyes. I'm not sure why I can see mistakes when scanned and not see them when looking directly at them. Of course, the girls have the soulful eyes that Suzi Blu teaches and will have flowing hair. The good witches hair is still mystifying me. It's not right yet, but getting there. At least the cocker spaniel dog ear hair is gone. . .
The "hairy" bad witch
I feel the hairy "Bad Witch" above looks mean and angry and old. My new bad witch is more youthful looking. I appreciate any opinions you might have. I'm not looking for compliments. I am looking for constructive criticism.
Again, this is all so new to me and exciting. I feel I am so "out of my comfort zone" but enjoying the challenge. I can't wait to complete the new logo and then I will have plenty of time to work on the two canvas and produce something that I truly am proud to display at Elena's event next year.
Last Sunday at Stamping Details, I think there were 18 persons in class to take Suzi Blu's Portrait class. A bunch of us were there because we are taking either Suzi Blu's The Goddess and the Poet class or her beginner Le Petite Dolls. We wanted to meet her in person and see her in action.
Since there were so many of us (her class was a hit!) Suzi brought along her friend Mara. Mara is a classically trained artist. She can draw faces that look like photos. We weren't exactly doing that but lips are lips and noses are noses and she was such a help to all of us and Suzi.
Sally with Suzi's bday cake
Since the day before was Suzi's birthday, I picked up a sheet cake to surprise her and feed all the females gathered - their sweet tooth! Boy was it sweet. . . A couple of other students who knew her birthday was the day before, brought little gifts. My friend Jackie got her some of the Japanese candy that Suzi mentions in one of her videos, plus a little Tinkerbell necklace. I think she appreciated everyone's thoughtfulness.
Gigi in mama's arms
Where Suzi goes, her baby, Gigi goes too. Those of us who have see her on her YouTube channel or are taking her online classes were all familiar with Gigi. What a sweet little girl. She just wanted to be in her mama's lap. There were so many of us. But she did have her little bed.
We didn't hear Gigi snore.
After drawing our girls, we then worked with our colored pencils doing our shading. After that there were multiple layers of clear gesso, paints, Stewart Gill paints for our eyes, rub-on's and the final coup de grace - flakes of gold leaf.
We all went home with finished projects. Suzi prefered us to work in or on a Moleskine book/page. She likes the purple label since the pages feel and look like butter. It's more like our base color than a pure white piece of paper would be.
Demo to class. One on one demo followed
The most amazing thing was that Suzi came around to each and every one of us and personally showed us either how to draw her eyes or noses or lips. As all good teachers should be, she is so supportive of her students efforts.
My friend Angela and her Goddess
We all got up and ooohed and awed at what everyone was working on or finishing up. 10 to 5 was perfect. We all left happy and hoping that she will start teaching perhaps every two months at Stamping Details in some sort of series. Let's keep our fingers crossed. We are so glad that she has moved to the San Diego area. Thank you Suzi.
One of Suzi's Goddess spreads
One embarrassing moment or day for me. I received the above photo of myself holding the cake with my under-panties showing. (Thank You PhotoShop!) I was so embarrassed. I guess my underwear was hanging out all day. I have to get some new clothes. Hey, if anyone ever sees this happen again - please take me aside and suggest a safety pin!
Today was the first day of Southern California Shop Hop 2009. There are 35 stores you can visit. I signed up at Stamping Details in Poway. They had animal backgrounds (choice of 3) and white rubber letters and ribbon for you to create your own badge. After I got home, I went to work on revising my badge using one of the napkins they had at the store and a small toy cougar I had at home.
Sally's Badge
Close up of Sally's Badge
The deal is if you wear your badge and pin to the stores between August 7-23, you get 20% off anything you purchase. If you spend $10 at a store, your make and take is FREE. Otherwise, it is $2.50 and if you want another make and take, it would cost $2.50.
Stamping Details' Zebra make 'n take
Besides the lion and the zebra, you could choose an elephant or a giraffe.
Vicki and Sally
Vicki Lamour, worker bee extraordinaire at Stamping Details, designed the make 'n takes. They actually were a technique using Adirondack inkers and slick card stock for the animal backgrounds.
The Friendly Plastic Elephant Pin
Vicki also designed and made Stamping Details pin in the shape of an elephant. She had a piece of jewelry in the shape of an elephant. Pressed it into a mold making product and then heated up black matte Friendly Plastic and pressed it into her elephant mold and added a pin to the back. They are great! That's using your creative juices.
Inside Stamping Detail with promotional poster
I made two 6x6's at Stamping Details and after I got home, I went over the white backgrounds with Distressed Ink on a little sponge so it wasn't so stark white.
Judy and Sally on couch at Paper Tales with our purchases
Then I met up with my friend Judy who is a middle school conselor and also works at Scrappin' Good Times in San Dimas (which is one of the 35 stores on the tour). Judy just happened to be down in San Diego for a week long conference and today at noon she was done. I picked her up at Campland and off we went to the two local stores.
Paper Tales make 'n take
Paper Tales was the first store we visited and shopped and made their cute 6x6 with their animal being a little teddy bear. This is a darling store. The decor is very vintage and don't be fooled by it's size. It is jammed packed with goodies with new things always there to be purchased. Her shelves are always full! Paper Tales is right next to Soup Plantation in Point Loma.
Next Judy and I were off to Scrapbook Your Life, my friend's Liz and Crystal's store. Again shopping enough to get their make 'n take for free! This store is huge with a wonderful area in the back for lessons of all sorts. If you are looking for paper, you won't be disappointed. They have the largest selection I have seen in Southern California.
Scrapbook Your Life make 'n take
The 20% makes the purchase of $14 Passport worth it. At three stores I have already saved way more than that! So, support your local stores and get shoppin'!
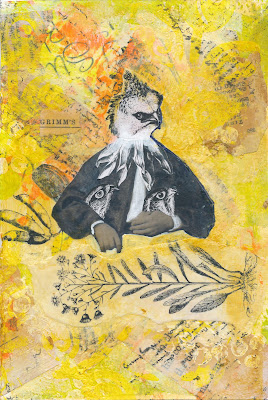
The two canvases above are not mine. They are Diane's. I put them first because I think they are a" show stopper," and will entice you to read on to see what we were doing in Karen O'brien's class last Friday.
Karen is such a great teacher who used to live in San Diego and now lives in Oregon. Her daughter still lives here so she and husband come down a couple of times a year, usually during Comic Con and the Art Walk in Little Italy.
In the classes I have taken from Karen so far, we always make backgrounds first with inexpensive paints and with black and white collage items.There are several layers to this process. After that was completed we then got to work with the sheet of b/w vintage people and then some b/w sheets with animals, flowers or birds to play with as our focal point. We cut them up and then put them back together to create a mythical character. It was a perfect project for a weekend when Comic Con was here all weekend also where the curious abound.
One of the best things about Karen is that she comes around the table where we are working the entire time to help you with your focus piece and with colors or anything you might be struggling to complete. (Trust me, not all teachers do that. . .). There are always hand outs and she always does a demo to demonstrate the technique the we are going to be doing in this class. Plus, she always has samples of her work available for you to see close up and personal.
Background before collage and more color
My other two canvases looked exactly like this canvas above before adding the collage items and more color. This is your basic background for some of Karen's techniques.
I have not finished either of my canvases and did struggle with colors.But, I wanted to share the concept which is so much fun.
My Miss Frogy Girlunfinished
Both Miss Forgy Girl and Mr. Girmm's are not finished. Both need more care and attention with color and pen detail work. Almost all my friend's completed at least two canvases and we all finished backgrounds on 4 canvases. I'm just a little slower and more unsure of myself. But, LOVED the technique and class.
Delicate Flower Girl by Nina
Here is my friend Nina's completed canvases. She even has them matted already. The little girl is my favorite. She just put the focal point together so quickly. I think she did an incredible job. And then, there's her crazy crock. Nina and I met in Karen's previous class where we sat next to each other. Consider visiting Nina's new blog called Voices in my Big Head and leaving your comments.
Baby Blue Croco by Nina
In the canvas below, you can see there is quite a lot of detail in Deborah's Flower Girl hat. She did a lot of work with her white pen . We also used either a stabilo pencil to define our characters or Golden's Payne's Gray to outline with a very thin brush.
Deborah is also taking K.C. Willis' online Collage Camp class. Deborah has one of her finished projects from that class on her blog., the Art Room in the Back.
Deborah's finished canvas
I met Angela in a Chris Cozen's class. She lives in Tijuana and comes up and plays at my house with other artists. She is a trained in the classics and has worked almost exclusively with oils and sketching. She has just started to work with acrylics. I have learned a lot from Angela.
Angela's Canvas
I spent all morning putting together some family vintage photos to share with my friends and take down to Kinko's to be copied so that I can continue to play with all that I learned yesterday in class.
Be sure to look for her classes in the future. Your money will be well spent on a class with Karen O’brien.
July 31st 2009: World's Largest Crop Attempt: Orlando, FL - CHA Craft SuperShow
Benefiting the Leeza Gibbons Memory Foundation.
The Craft SuperShow is proud to partner with Scrapbook Royalty to host the World's Largest Crop attempt on July 31st, 5:00-11:00pm at the Orange County Convention Center in Orlando, Florida. This exciting event will feature:
Celebrity Appearances by your favorite Scrapbook stars
Product give-aways, goodie bags, and door prizes
Charity Raffle to benefit the Leeza Gibbons Memory Foundation
Come be a part of the fun, bring your friends, and crop the night away... for a good cause!
"AFFORDABLE REAL ESTATE" is the name of the class that Denise Kelly and Linda Moore are teaching at Stamping Details on Saturday, August 22.
The Real Estate Houses
The reason I mention this is that myself and five other artist friends of Denise and Linda had a terrific play day at Linda's home.
Deborah, Denise, Debi, Laura Sally and Linda
August will be the first time they are going to be teaching this class and wanted a "dress rehearsal" to make sure they didn't miss anything when they teach the class. There were so many different treasures to enhance our little houses. Obviously they had been out scavenging the local junk and vintage (used?) hardware stores. Who knows where all they had been, but the selections was great. Everything was provided. We didn't need to bring anything unless we truly had something specific we wanted to use.
In my case, I had no idea what we were going to be doing. My creativity didn't start until I saw the wonderful samples.
Sally's House
My project developed slowly with the painting taking me the most time to get what I wanted.
My final touch was the addition of black buttons of different sizes on the side of my roof. It needed a little texture.
What to put in my windows? Linda brought over a miniature Sear's Catalog and started flipping through it and came up this page of undergarments for men and women. I thought the size of the heads would be fine and then I had a light bulb moment. The two women were posed perfectly to be sitting on my window sills and there was one woman standing. Yes! Then I decided the woman standing need to have a key over her arm. Linda rushed into her organized stash and brought out many different choices but kept saying "this one is good but wait." Her last choice was the one I used and she knew it would be the best choice. Thank you, Linda.
"Happy Mistake" on the roof
I did have a "happy accident." I first painted my room an eggplant color. Then I decided to use a Lumiere to jazz it up a little. That was to slick so I made a wash out of some craft orange paint. Finally I was using some black oil crayons and rubbing that in to get a smokey affect when the Lumiere started lifting. I ended up pushing the skin of the paint around until I formed a keyhold shape that showed my original paint with a little flower peaking out from below all those layers that I obviously had let dry completely before adding addition paint. OH, well. Lucky me. I love this little key hole in my roof.
With all of us sitting around the tables it was so interesting how our minds all went in a different directions. Everyone was helpful and offered suggestions when asked. Very friendly atmosphere.
Deborah was finished first! She said that was because she has done this before. The hardware she used and the way she used it was so bold. She helped me with the oil crayons and how to use them to bring more interest to my background.
Laura's House
Laura had come with her idea ready to execute. She was making a "house of cards." She cut up some playing cards and used them as a stencil that she adhered.
Georgia's House (unfinished)
Georgia came with some things from home but get hers completely finished. She said she had more things at home to add. Can't wait to see the finished project.
Debi's House
Debi went with her favorite colors and "Debified" her house. The numbers that started out silver she colored with alcohol inks. Her colors are so yummy and happy.
Denise's House
Denise was almost done with her painting when she decided she didn't like it at all and started all over. I don't know if you can see the door nob and realize that it is covered in wax and ended up looking like a bird's egg. She certainly achieved success with her finished project!
Linda's House (unfinished)
And then there is Linda's house that went to the fishes! Spectacular. It's hard to see how wonderful this house looks in the picture. There is copper scrubber that was pulled apart and fits like a nylon over the wood panel. Then there is cheese cloth(?) that had been dyed and attached. The wood itself and the roof look wonderful in person. And then there are all the little charms that she sewed onto the netting.
The final touch to our work was the application of encaustic wax. I had only once used this before - a long time ago at Georgia's. I remembered nothing. . . Linda and Denise gave excellent directions as to how to apply and work with it after you covered your entire board with the wax. And then you polish this wax with a shop cloth. Deborah's house glowed from her polishing.
You will love this class and it's teachers. But, what you will miss when you take this class at Stamping Details is the wonderful lunch Linda provided for us and the setting in her patio where we ate lunch and took a break. What a wonderful host and hostess she and her husband are. Yes, Wayne was there also and we all wanted to borrow him in our home to do various and a sundry things. The man has neat and organized down to a science. . .
Thank you Denise and Linda for inviting me to play at your home.
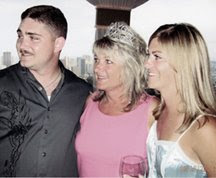
40 friends and family for a sit-down dinner and open bar at Mr. A's. What a Surprise! I LOVE surprises so they surprised me by having the party 6 months early - one way to have a successful surprise party. . . That's Erik La Com on the left and Kari La Com on my right. Great kids! (oops, I mean adults).
Not sure why I am doing this. I always want to learn new things about the computer. This "Creating a Blog" is all new to me. Until my local adult education computer center offers a free course in setting up a blog, I am on my own with the help of my friend, Bets.
What exactly do I want to do with this site? I'm not sure. I guess, post photos of things I am doing, people I am interacting with family wise or art/scrapbook-wise. Not sure. Remember, "Every day is an Adventure" and "what is life but for Risk" has always been thoughts to live by. So here I go. . .
Work the book!!!!
-
Finally!!!
September is here, fall is near.
I hope it brings calm changes!!!
Starting today over in my Facebook group-
CREATIVE HAND LETTERING WITH LINDSA...
Happy Hallowinter & Cookies!
-
Hello again and Happy Halloween! We have been getting slammed with snow
here in the Rockies this week. I think we got roughly 12" of snow this
week. Craz...
for the love of pacing
-
My friend Robert asked if Would pace him for the last 16 miles of the SD100
. I think he did it because I was not bale to run it this year and this way
h...
NEW Ranger MAKE ART products for 2019!
-
*YIKES...*
I had to get the vacuum out to suck the cobwebs from this blog!
no chit-chat...lets get to it...
without further ado...introducing my
*BRAN...
When Two Hearts Meet; Petaluma, Ca. Workshop
-
“When Two Hearts Meet”
by Debby Anderson
~ a Two Day Workshop ~
Hosted by Caron Hibbons in her beautiful home in Petaluma, California
“Soulful Hearts” ...
ITAC17 - ChaLLeNgE THREE!
-
ITAC17 Time for Challenge 3 - Oceania! O-M-G!
I'm getting so much fun and guess what? Learning a lot!! I didn't know
Oceania has a lot of stories and le...
Announcing! Solo show art reception!!!
-
Saturday, June 24, 2017 6:30 - 9:00pm at Nainsook Gallerey in La Mesa
Nainsook Gallery
8130 La Mesa Blvd.
La Mesa, CA 91941
(619) 303-8060
New work!! Bar...
Sad Unicorn
-
I didn't know if I needed to post this, but then I realized I did.
Monday January 16th was supposed to be the start of my IVF cycle. I have
been doing all...
Mummy Fun
-
I love Halloween
...and fall
...and Dia de los Muertas
I'm having fun making these mummies
to use in my jewelry
I saw them on Pinterest
and knew I had t...
Inspiration Monday
-
*Inspiration Monday*
(Colleen Moody Cuff)
Tattered Adornment Cuff
Art Retreat at the Beach, Irvine, Ca.
June 11, 2016
vivimagoo.com
*I am a proud ...
Found in the Flood Live at Hotel Cafe' in Hollywood
-
My favorite band..."Found in the Flood!" Hunter Van Houten, Jordan Parker
Smith, Melody Michalski and my son, Sean Simpson They played at the Hotel
Cafe' i...
Nina Bagley class at French General
-
Cute huh>>>> On October 19th, it was my mom's birthday, since she isn't
here anymore to celebrate it with, I decided to take a class since I
haven't in so ...
Digital Scrap - Frenchy Chair Silhouette
-
Click HERE for the PNG File with the Background Removed Today, I'm offering
a this cute Digi Scrap graphic! Shown above is a Frenchy Chair Silhouette.
A l...
Matilda's Mouse Show Coming Soon!
-
Love Daylight savings time and the coming of Easter meaning Spring is just
around the corner.
March 23, 24, 25 is the next Matilda's Mouse Easter Show, th...


 I'm still drawing and I am so far behind.
 One more bad witch minus hair






 Posts
Posts


