Monday, January 24, 2011

Terri Brushe's Crown Class at Urban Barn

My finished flat quickie crown
with black patina

This past Sunday at the Urban Barn in Escondido, CA, my friend Margo and I took Terri Brush's Crown Soldering class. (Click on this link to learn more about Terri's classes - Terri Brush Designs ) She was very organized and the only thing she told us to bring was some jewelry tools which she told us we could get a kit at Michael's for about $9.99. In truth, we didn't even need those.

Sample Crown

Terri provided all of us with the Weller 100 (the blue iron) plus and stand, a metal tray to work on which she told us we could take home with us, flux, solder, sponge, etc. etc. - everything we would need and then some. And then, of course, the product.

Sally's Tray

Crown in progress Unknown Artist

The Urban Barn is a great place to take a class. It is so big and airy with good natural light also. We were all at one long table as you can see from the photo below.

The long table where we worked

Terri got us all started cleaning, taping, fluxing and soldering about 24 glass bobbles. She is a very calm teacher and kept moving around the entire perimeter and was readily available for any questions we might have. This was not a first time soldering class so there were no Step One, Step Two instructions.

About noon, delicious pizza arrived and we could stop whenever we were ready and eat and have some refreshments. Later in the afternoon, cupcakes and chocolate chip cookies appeared. Plus,s there were giant bowls of M & M's with peanuts on the table.

In my immediate locations I met some new friends. Across from me was a gal named Robin Sanchez who lives in Oceanside and had super information about a "gig" that takes place about twice a year in Manhattan Beach and is put on by Artistic Bliss and Kim Caldwell. Check it out!

My end of the table

To Robin's left in blue was a gal named Nelda. It turns out she lives close to me but is allergic to birds and there for, since we have to my regret, my husband's double yellow amazon parrot, she can not come play at my home.

To my right was a very quiet and sweet gal named Debbie. Margo is sitting at the head of the table and my chair is vacant.

We were to make a base for the crown by soldering three glass bobbles together at a time and then soldering them to themselves to make a circle or part circle.


Two photos of Sally's base for her crown

I choose to work on a small flat crown for my first project. Any of you who have followed my blog know that I am a devout fan of Suzi Blu and her girls. I decided I wanted to make a crown for one of my girls. The width was only 2 1/2 inches. Below is the base that I started with for my crown.

Base for Sally's small crown

Enter the embellishments lady. I could not believe all that she brought in for us to add to our crowns or to just purchase for further reference. I don't know her name but she said that when we saw our credit card statement it would read "Peeps."

"Stuff"

More "Stuff"
That's "Peeps" in the left hand corner of photo


Above
Three photos of Sally's stash purchased from "Peeps"


Margo hard at work

Above is my friend Margo who solders so beautifully. She was very interested in the product we were using this day. She and Robin both mentioned that they didn't have to clean their tips like they usually did. Plus, the solder flowed so easily. I totally agreed even though I have hardly any practical experience. I did take a Sally Jean class last year. Most of what I know, I have learned from Margo. She is a perfectionist and does beautiful work. She also is amazing in Photo Shop. Below is my Christmas present from Margo. It is so beautiful. Thank you Margo.

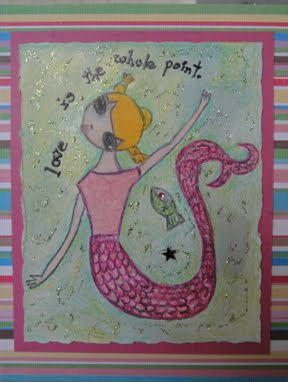
Tree Ornament created by Margo

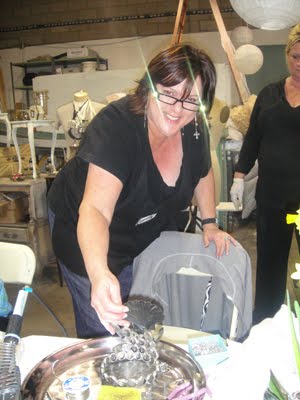
Unknown Artist wearing glasses with lights.

I didn't get this gal's name but she was soooo much fun. She is styling ladies with her special purchase from CVS pharmacy of reading glasses with bright lights on both sides of the glasses that shine down on what ever you are working on. She said they cost about $24.95 and come in various prescribed strengths. We all vowed we would be going there to purchase our own. Fun and practical!

Debbie fast at work on her crown


Close-up of Debbie's crown (I think)


Another sample - artist unknown


BEAUTIFUL finished crown - artist unknown


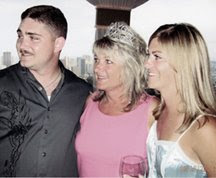
Terri and one tired eyes Sally

Friday, January 7, 2011

Silly Sal - Knitting Once a Year


Close up of Purchased Purse

Once a year, I knit for a couple of days. The reason it's only once a year? Well, our Best Man, Richard and his wife Sharon, come and stay with us and help us celebrate our wedding anniversary every year. We were married at our home at 8 pm on New Year's Eve, 1994. Sharon is a knitting maniac and makes beautiful and difficult projects. She doesn't scrapbook nor paint nor sketch. So, our common ground and how I can improve my knitting proficiency takes place at this time. This year they were at our home from Thursday before New Year's Eve and returned to their home in Glendale on Tuesday of the new year.

Purchased Purse

So before she visited, I went to the local Knitting Store called Knitting in La Jolla on Prospect. The owner is such a helpful person. I saw this beautiful purse that she had made and said I wanted to make it. Well, it turned out she didn't carry the yarn any more or any yarn like it that would work. Plus, she got the pattern on line from Sweater Babe - pattern #19. In the end, I purchased the sample from her along with the pin that I placed in the center of the flower she had designed that was not part of the pattern. The purse that I purchased is the exact color of the favorite very heavy sweatshirt jacket that I bought last year at JCrew. Plus, I also have Uggs the same color. Yea! I will finally match!

At home I download the pattern and now go off to find yard to make the purse myself. The next closest yarn store is by my friend Suzi Blu's home in Encinitas - The Black Sheep. I didn't find what I wanted there either so off to Michael's. They have this thick yarn always in stock and purchased the black and the gray.

Purse I made with two yarns

Here is the purse I made with the Black yarn. I added a skinny black fuzzy yarn with a white flag that I thought would spruce up the solid black yard. Well, two things happened: the skinny yarn really bulked up the yarn and the purse ended up a lot bigger than the sample purse; plus, you can't see the wonderful simple pattern with the fuzzy/flag yarn added. I then knitted a single stitch to make a latch to go over the plain white button I added.

Close up of my purse fastened with button

OK, what I liked the most about the sample I purchased was the pattern. So, I knitted another one and it came out perfect. But, it needs more than a button to compliment the simple design.

My dark gray purse


Close up of "my flower" that I winged

Amazingly, I picked up a crochet needle that we were using to tuck in the yarn on the back sides and proceeded to crochet a tight circle and try to remember how we did something like this at Margie-Romney-Aslett's workshop called Spark! The Event in Utah over a year ago. I just winged it and I think it is fine. I'm going to sew Velcro at the top to work as the fastener on this purse.

Pink hat that I made

The year before I had learned to make this little hat that was a patter from designer Kim Hargreaves, called Elsie. It is in a book called The Rowan Cork Collection. This hat was the first thing I ever knitted beyond scarves and one shawl. I actually made a couple of them the year before.

Pink Scarf that Patricia made

Well, Suzi Blu rents her house from the neatest gal, Patricia who owns the wonderful little shop in Leucadia called Embellishments. She had theses beautiful scarves that she crochets and I asked her to make me one in pink which she did. So, at The Blac Sheep, I found this beautiful silk/wool/Alpaca yarn that worked wonderfully with Patricia's scarf yarn.

Patricia's pink scarf again

I am going to wear all of this when I go back to Baltimore January 29 - February 1. Yes, this is the same time I was suppose to go with Suzi to CHA in Los Angeles this year. I am very sad to miss this fun time and Suzi understands. I have promised to help her however I possibly can all month while she prepares for CHA. My son is graduating and the entire family is going back there to be present and support Erik's accomplishments. I sure hope it is cold and I will have the opportunity to wear some of theses warm things I have knitted. When I visited him in November they had a warm spell and I didn't need any of the warm clothing I had brought.

New Year's resolution - to improve on my picture taking and presentations. I have no excuse except that I use a very, very small Sony Point and Shoot. But, I truly know PhotoShop and CS5. I need to take the time to use it when my camera fails me. But, I hadn't posted for so long, I just wanted to get this up.

Thursday, December 9, 2010

Look What Canada did!

Would you not have loved to be present at this food court in Canada, taking a little break from Christmas Shopping. Brings tears to my eyes!

Monday, November 1, 2010

My Suzi Blu Cards from Suzi's Stamps

I'm not sure why making cards is so difficult for me. I surmise that perhaps it is because it is a more exactly art form. Altered Art appeals to me because it is not exact. Plus, the one skill I truly haven't got a handle on is color. It is such a trial and error thing for me.

Here are three of my favorite finished Suzi Blu Stamp cards. The first one is in my favorite color - Pink. I have added a crown and Stickles. The heart is a glitter embossing powder that I had never used before. The flowers were a ribbon roll that I got at Stamping Details and cut apart and then put rhinestones in the centers.


I am wondering if this is Suzi's Stamp or if I copied a card she made for me that I thought she was going to make a stamp. The saying was her saying "Love is the whole point." The design her all hers..


I love this stamp. I just happened to have the ice cream cone sticker and thought it went great. Now I am going to look for actual cupcake stickers. I'm sure they are out there. . .

The backgrounds were done with H2O's and metallic water color paints that i was fooling around with - I don't do that very often. Suzi was videoing and I was just making backgrounds for all her girls I had stamped. Fun.


What has helped me the most when I really think about it is the section of Somerset Magazine where they have an artist select her palette and then show what she did with it.

I have also learned from Chris Cozen , Suzi Blu (at Suzi's link you can see what she did with her stamps) and Julie Prichard is to select something out of a magazine or scrapbook paper that has already made the decision of what colors look good together and then try to emulate them. But, that takes some forethought and preparation.

When I was visiting Suzi the other day at her seaside new home she talked again about selecting your palette before beginning. I just thought artists just picked a color and then looked at what they had done and then selected another color that they thought would look good with the first color. I had no idea that there was preparation involved!

Here are my humble attempts at card making with Suzi's darling stamps from Unity Stamp company owned by this wonderful woman, Angela who I met at Melody Ross' Brave Girl's Camp this year.

Theses were all done before I tried to add embellishments. They are just missing something! The final products are the single photos. There were more and the best one's I did are already sent to some of my dear friends and relatives. I love that I had things I personally made to send. I hope they loved getting them from me.


The remaining cards are the finished cards. I know I talked about being "challenged" are cutting and being exact. Trust me, I truly was on theses but because of the angle I shot theses photos, and then cropping them in PhotoShop, they look like I didn't cut evenly. No, I was just too lazy this time on my birthday - yes, today is my birthday - to mess with this aspect. I hope you can see the difference when the cards are finished.


Yes, those are big dimensional stones that make the flowers in her hands. I love all things lumpy. Glued them down with E6000.


Tuesday, October 26, 2010

U F O's - Sally Jean Alexander's Halloween Necklace Class

Silly Sal's almost finished necklace

Sally Jean helping Silly Sal

Last week Margo and I took a soldering Halloween necklace class from Sally Jean Alexander. I consider her a nationally know artist of considerable repute and when ever I can take a class from this level of a teacher - I do. (My first nationally know artist/teacher was Lynn Perrella. I took the class at Art Unraveled in Phoenix several years ago. What an excellent teacher).

Our Work Room at Cheryl's home


Sally Jean's class was her at her friend, Cheryl's private residence in Poway. Cheryl is a jewelry artist in her own right. Her pieces are exquisite and can be purchased in her Etsy store. As you can see, the room where Sally Jean taught was huge. We were not crowded at all and every table had two power strips.

Sally Jean and Margo

There were 16 of us and it seemed like only my friend Margo and I were the only ones who hadn't signed up for all 4 days of Sally Jean's classes. Displayed in Cheryl's home were her chandeliers (yes plural) she had made in previous Sally Jean's classes. So very beautiful.

This class theme was Halloween. Sally Jean took us through simple steps, with a demo showing us what that step entailed as we moved through the process of making the main focal point - a shaker shadow box made out of 5 main pieces of glass and 4 little pieces that her husband had cut for us.

Margo, Sally Jean and Silly Sal

In preparation, I had spent a day with Margo and Kathie tuning up my limited soldering skills. After being frustrated with the two soldering irons I already had, I went out and purchased a Weller 100, a rheostat and a stand. Much better! What a difference it makes to use the right tools.
Friends Kathie and Margo at Silly Sal's

I had also decided to us my own art and choose the 1st thing I had ever drawn from my 1st Suzi Blu online class which Elena of Scrapbook Royalty had commissioned me to draw and paint. It ended up being two paintings called "Good Witch", "Bad Witch." I shrunk them in PhotoShop CS5. Didn't know what I would need them for but they ended up being my main focal point.

Then I went through my children and my Halloween photos when we were all much younger and resized them.

Sally Jean showed us how we can solder ANYTHING including small branches which she attached to her piece. (She has requested that I not publish photos of her necklaces).

If only I had stayed with her simpler design with just a chain and charms hanging from the chain. I thought, what if I don't do this again. I want this to be like I want it. I decided I wanted all my glass charms to be a part of the chain, not dangling from the chain. I had no idea how much work that entailed. Yikes!

Silly Sal's necklace in progress
Taped but only partially soldered

I left that day's class with my main piece soldered and a couple of other pieces soldered with their jump rings. I learned a lot and knew I could do much better with practice.

More charms in various stages of developement

This Sunday I finished my necklace, but I don't wear pieces this big so what to do. In the mean time I had found more photos I wanted to incorporate into my family portrait of our Halloweens. Enter fate or one good turn deserves another!

The newly purchased tree where
Halloween charms will reside in the future

Yesterday I was helping my friend Suzi Blu to move to Leucadia, I met the person who Suzi is renting from and who also lives on the property - Patricia. What a talented and wonderful person. I think Suzi is going to be very happy here. Patricia also owns a store in Leucadia/Encinitas on Pacific Coast Hwy called Embellishments. Here is her card.

Business Card for Patricia's business
Embellishments

Before we went to visit her darling shop we were in her garage because she said she was going to have a garage sale this coming Sunday. There I saw this metal display tree. (I had been entertaining the thought of using a Manzanita branch to hang my Halloween charms). I purchased this "metal tree" and as you can see from the photo below, it is waiting for the fruit (my family charms) to be transformed once again and hung.


Various stages of Silly Sal's second attempt
at Mermaid Shaker Shadow Box


Back at the class, I had purchased two extra kits from Sally Jean. One of that day's project and another of the day's before which I had seen a photo. I decided to make a smaller shaker box out of my favorite mermaid I made in another Suzi Blu class and put teeny sea shells, seed beads and a very teeny tiny sea horse. I have yet to foil wrap it but wanted to get this up as soon as possible. That is the same for the shrine piece of glass that I purchased in the extra kit. There I put my gypsy painting after sizing it and creating a background for it too.

Nothing is finished as you can see. But, like all my friends, I have multiple projects going at the same time. I just started Danita's online class through Crescendoh. Then there is Suzi Blu's current online class which I am constantly sketching and painting.

Sally Jean at Cheryl's Goodie Table

Check out the cookie on top of the scone
that one of the students had made for this class

Did I mention how good the treats were at the Sally Jean class - plus lunch from Panera's - Yummy!I will for sure take another class at Chery's when Sally Jean returns next year to teach. I think you should too. I know you wont' be disappointed.

Side note: This week I was honored to be Jenny Doh's Crescendoh Guest Curator for her Art Saves feature. It is my true story. I am truly blessed by all my old friends - never to be forgotten - and my new friends found and cultivated by opening my heart and soul to art. For me Art Saves!

Oh, by the way, U F O's stands for Un-Finished Objects. Well, my project is almost finished but it is also still a work in progress. I will explain as I go along.